Stepping Back and Finding my users [Week 10]
- Rikka Ly

- Oct 16, 2020
- 3 min read
Updated: Jul 25, 2023
After talking to my lecturers about my idea, I decided to take a different approach. It seemed like I was getting off track and gravitating toward less future ideas and more current. It was essential that I had a good base to start development. I went back to the start of my ideation and attempted to find a specific niche of music production to design for an audience. I had a previous idea of voice-controlled music synthesis and decided to research into disabled creators.
The Needs of Disabled Producers
Disabled people may have a loss of one of the 5 senses.
It may be hard for people with disabilities to exert pressure with their hands.
People who have a disfiguration/loss of a limb may not create with traditional software.
Disabled people often have one part of their body with a range of movement - like their arms, legs, or head.
Ways to distort and create audio with your body is more comfortable to play with for people who have trouble learning complicated controls.
I decided to focus on a few aspects. For example, a device that can be used independently without help. Uses voice-control as well as motion tracking. Uses machine learning to map to the beat and ensure any fine-tuning is the owner's preference rather than making the song professional.
Miro Boards
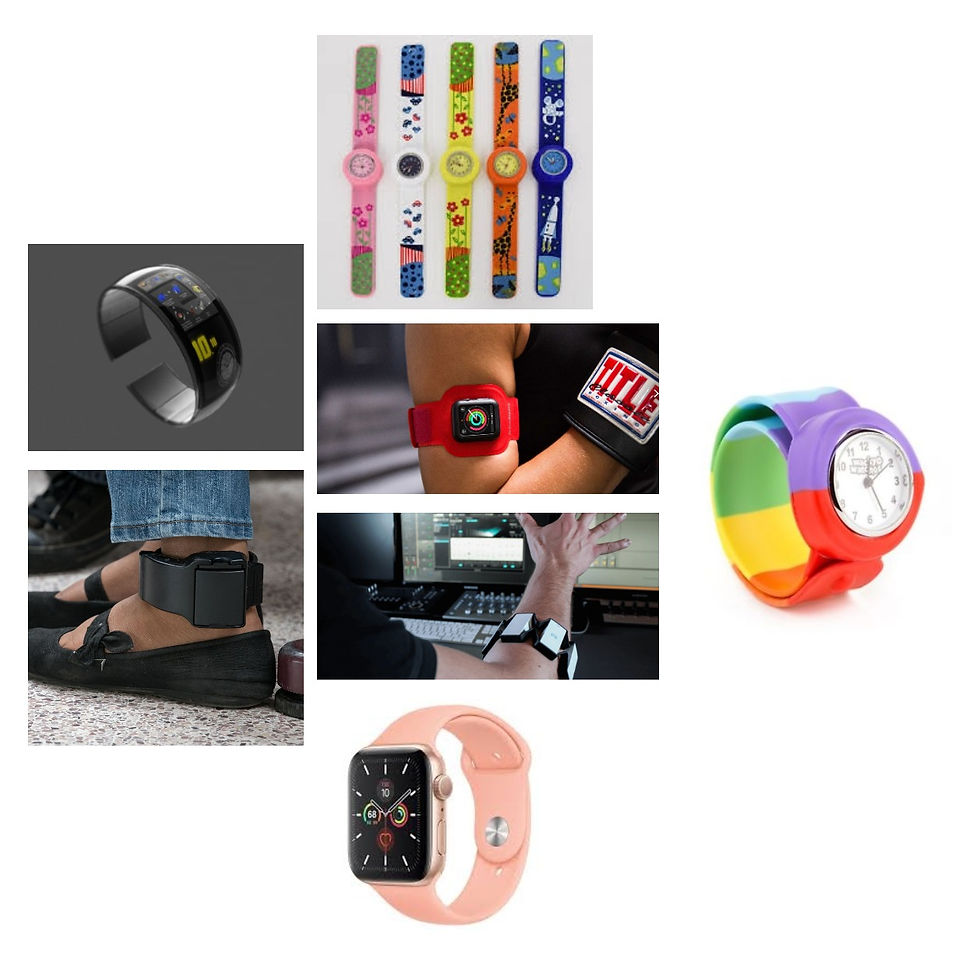
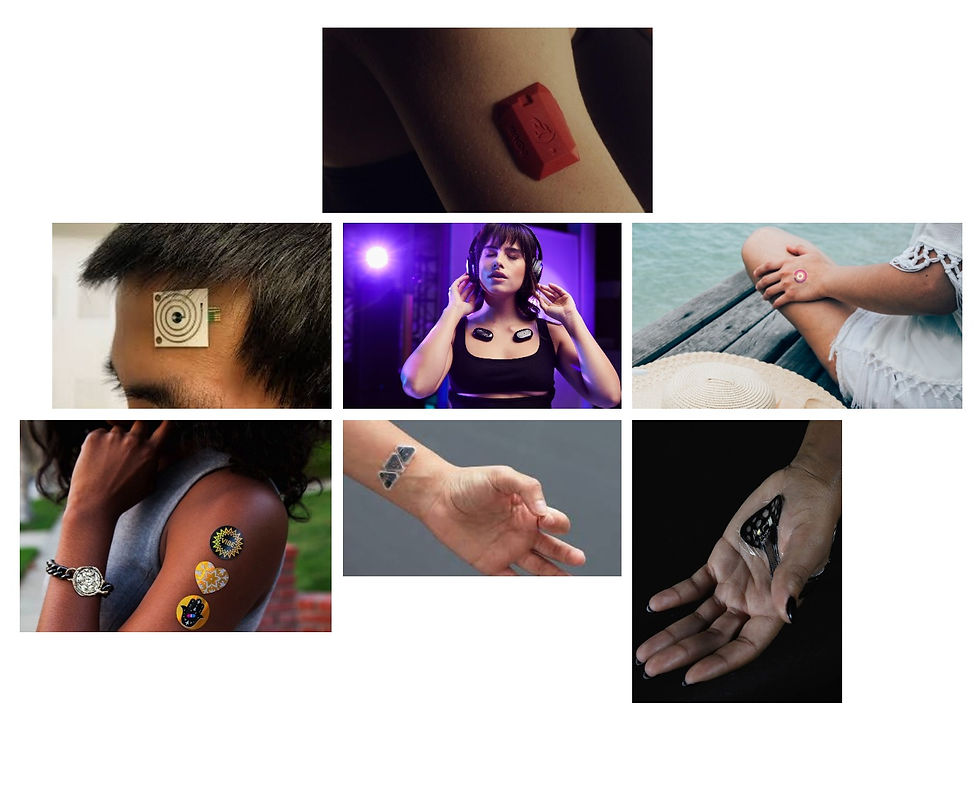
I decided to explore some options for a wearable device through Miro boards.

The movement device is something that can be strapped or slid onto an arm or leg. This excludes the head and may require the help of a second person. This could allow for a more outstanding tracking of movement due to the large area covered. However, this device would exclude some of the disabled community by needing a limb and the potential inability to operate it yourself.

This Miro board demonstrates a device with a strap that can attach to any circular limb. This device can be connected anywhere along the arm or anywhere along the leg. The width of the band determines this - may be able to attach to the waist too. Preferably this device would be able to secure without the use of hands. One idea would be the strap to lay flat like a stick and wrap around the appendage after pressure or voice activation. It would also detach this way. This is slightly more tricky than the sticky device, as the user has to maneuver their limb to have the device attached at the right angle.

A device that sticks and unsticks to your skin at will. This would allow the user to put the device on and off without the use of a hand. It would need some way to grip or stick to the skin with a method of removing it that doesn’t require a hand. Potential ideas are using voice or bumping it gently on a surface. This would allow the user to use any moving body part to control the device. It would also allow for greater accessibility in personal use for people who have trouble putting on gear.
Draft Device Description
The user starts the software and puts on the movement device. The button device is placed on a table or on the floor.
Movement Controls
Moving the device up during recording goes up a note. Moving the device fast will skip to the note that the user rests on. The user can see a faint outline of which note they are currently on to help reach the note they want.
Moving the device outside of the recording allows the user to test their instrument and explore the notes.
Shaking the device allows the user to edit the current section/beat.
Button Controls
Holding the button switches between editing sections or beats.
Tapping the button goes forward on a section/beat to allow for editing.
Voice controls
Start the recording - "Start"
Stop the recording - "Stop"
Open the instrument library - "Library"
Go to a previous stage - "Back"
Redo a back - "Redo"
Change Layer - Say the number of a layer
New Layer - Say a number that isn't a layer yet
Controls - "Help"
Prototyping Plan
Week 9
Sketch up the device based on music tech available and the specifications.
Finalize the gestures and movement control
Week 10
Create the interfaces that the device will use.
Make a physical prototype and practice how it will be used to fine-tune the controls.
Week 11
Model the devices in a 3D rendering app.

![Refining my Idea and the Presentation [Week 9]](https://static.wixstatic.com/media/3f510d_9df540d01c294626a355a4f05d0e5e36~mv2.jpg/v1/fill/w_980,h_776,al_c,q_85,usm_0.66_1.00_0.01,enc_avif,quality_auto/3f510d_9df540d01c294626a355a4f05d0e5e36~mv2.jpg)
![Starting a New Semester with Forward Thinking [Week 8]](https://static.wixstatic.com/media/3f510d_03ea4d9de9d143d9b0467dc4f052f080~mv2.jpg/v1/fill/w_980,h_842,al_c,q_85,usm_0.66_1.00_0.01,enc_avif,quality_auto/3f510d_03ea4d9de9d143d9b0467dc4f052f080~mv2.jpg)
![What Really is the Future of Music Production? [Week 6]](https://static.wixstatic.com/media/3f510d_d0b4d8fa40ae40a1ac68013fdb0a8d99~mv2.jpg/v1/fill/w_800,h_417,al_c,q_80,enc_avif,quality_auto/3f510d_d0b4d8fa40ae40a1ac68013fdb0a8d99~mv2.jpg)
Comments